Table of Contents
이클립스(Eclipse)에서 STS 를 설치하면 아주 간단하게 Spring MVC 샘플 프로젝트를 생성할 수 있다. 이 샘플 프로젝트의 디렉토리는 다음과 같다.
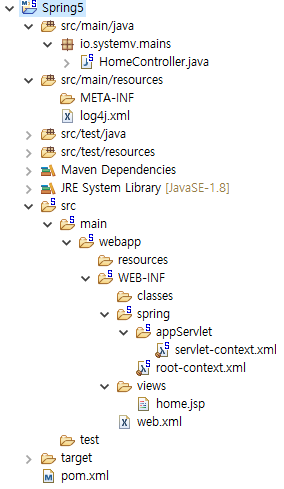
엄밀히 말하면 사실 이 디렉토리 구조는 Maven 이 관리 한다. Maven 에서는 기본적으로 Java 소스 디렉토리, Resource 디렉토리, webapp 디렉토리를 위와 같이 정의해 놓고 있다. STS 의 Spring MVC 샘플 프로젝트도 Maven을 기반으로 만들어 졌기 때문에 위와 같은 디렉토리 구조를 가진다.
하지만 한국에서는 다음과 같은 디렉토리 구조를 주로 사용한다.
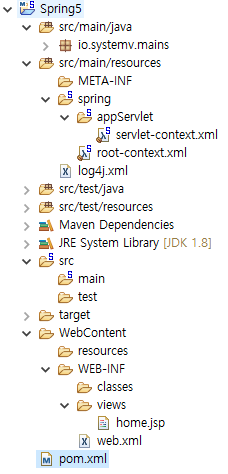
webapp 의 루트(root) 디렉토리를 WebContent 로 바꾸고 스프링의 설정 파일인 root-context.xml, servlet-context.xml 를 Resource 디렉토리의 config 디렉토리 아래로 옮겨준다.
이러한 구조로 바꾸기 위해서는 Maven 설정을 만줘져야 하는데, 이클립스를 이용하면 손쉽게 위와같은 구조로 변경할 수 있다.
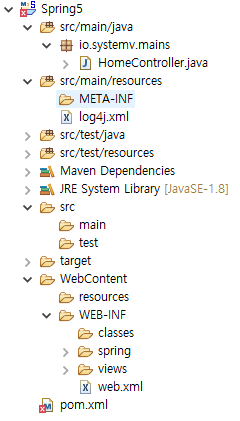
WebContent 디렉토리 생성
webapp 디렉토리를 WebContent 로 바꾸기 위해서는 먼저 디렉토리를 만들어야 한다. 이클립스에서 프로젝트 아이콘에서 오른쪽 버튼을 클릭해서 WebContent 를 만들어 준다.
생성이 되었다면 이제 기존의 webapp 디렉토리 아래에 모든 디렉토리와 파일을 WebContent 디렉토리로 옮겨준다. 그리고 webapp 디렉토리를 삭제해 준다.
이렇게 옮겨 놓고 보면 pom.xml 파일이 오류가 난다. 오류의 내용은 다음과 같다.
|
1 2 |
Description Resource Path Location Type web.xml is missing and <failOnMissingWebXml> is set to true pom.xml /Spring5 line 8 Maven Java EE Configuration Problem |
Maven 에서 정해진 위치에 있어야 할 web.xml 이 없기 때문에 나오는 오류다. 따라서 Maven 에서 web.xml 디렉토리 위치를 바꿔 주면 되는데 먼저 pom.xml 에 maven-war-plugin 를 추가해 준다.
|
1 2 3 4 5 6 7 8 |
<plugin> <groupId>org.apache.maven.plugins</groupId> <artifactId>maven-war-plugin</artifactId> <version>3.2.0</version> <configuration> <warSourceDirectory>${project.basedir}/WebContent</warSourceDirectory> </configuration> </plugin> |
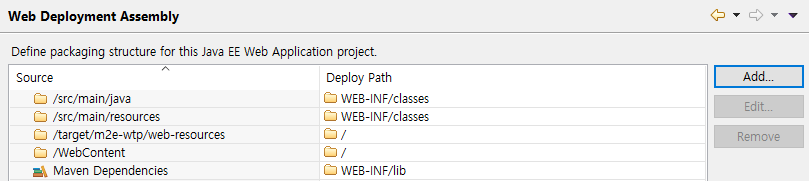
그리고 이클립스에 설정으 바꿔 줍니다. 프로젝트이름에서 마오스 오른쪽 클릭 후에 ‘Properties -> Deployment Assembly’ 를 보면 /src/main/webapp 이 보인다. 이것을 삭제하고 WebContent 를 추가해준다.
이렇게 한 후에 pom.xml 파일의 오류가 사라지는것을 볼 수 있다. 만일 그렇지 않다면 Maven Update 를 한번 해준다.
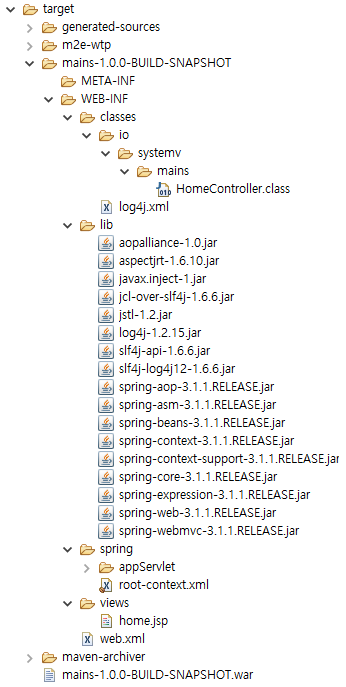
이제 Maven 을 이용해서 프로젝트를 빌드 해본다. 성공적으로 빌드가 됐다면 다음과 같이 나온다.
Spring 설정을 WebContent 와 분리
WebContent 이름에서 보이듯이 이 디렉토리는 Web 관련 파일들만 모아놓기위한 것이다. Web 관련 파일이라면 CSS, JS, Images, JSP 로 대표되는 Web Frontend 파일을 말한다. 하지만 자세히 보면 Spring 에 관련된 파일 들도 있어서 이것을 Resource 디렉토리로 옮겨 놓는게 적절해 보인다.
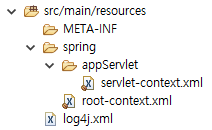
먼저 src/main/resources 디렉토리에 ‘spring’ 이름의 디렉토리를 생성해준다. 디렉토리를 생성했는데 패키지 아이콘이 나온다면 ‘Build Path’ 에서 Exclude 해주면 된다. 그리고 spring-root.xml, spring-context.xml 두개의 파일을 모두 resources/spring 으로 옮겨주고 기존의 WEB-INF/spring 디렉토리는 삭제해준다.
Web.xml 파일에서 spring 설정 파일의 경로를 변경해 준다.
|
1 2 3 4 5 6 7 8 9 10 11 12 13 14 15 16 17 |
..... <context-param> <param-name>contextConfigLocation</param-name> - <param-value>/WEB-INF/spring/root-context.xml</param-value> + <param-value>classpath:spring/root-context.xml</param-value> </context-param> ..... <servlet> <servlet-name>appServlet</servlet-name> <servlet-class>org.springframework.web.servlet.DispatcherServlet</servlet-class> <init-param> <param-name>contextConfigLocation</param-name> - <param-value>/WEB-INF/spring/appServlet/servlet-context.xml</param-value> + <param-value>classpath:spring/appServlet/servlet-context.xml</param-value> </init-param> <load-on-startup>1</load-on-startup> </servlet> |
그리고 pom.xml 파일을 다음과 같이 변경해 준다.
|
1 2 3 4 5 6 7 |
<build> <sourceDirectory>src/main/java</sourceDirectory> <resources> <resource> <directory>src/main/resources</directory> </resource> </resources> |
이렇게 디렉토리를 변경하는 이유는 앞에서 잠깐 언급했지만 Web 컨텐츠와 Spring 설정파일들을 분리하는데 있다. 또, 이렇게 함으로써 자바 관련 파일과 Web 컨텐츠 파일을 손쉽게 분리해서 배포할 수 있게 된다.