Table of Contents
 이 글은 STS(혹은 Eclipse) 를 사용해서 Hello World 를 만드는 법에 대한 것이다. Eclipse, STS 를 설치했다면 자체적으로 간단한 샘플 프로젝트를 제공 한다. 아무런 설정도 필요없고 간단하게 패키지명만 입력해주면 샘플 프로젝트가 제공되고 브라우저를 통해서 확인할 수 있다.
Eclipse 에는 Spring IDE 플러그인이 설치된 것으로 가정한다.
Spring Legacy Project
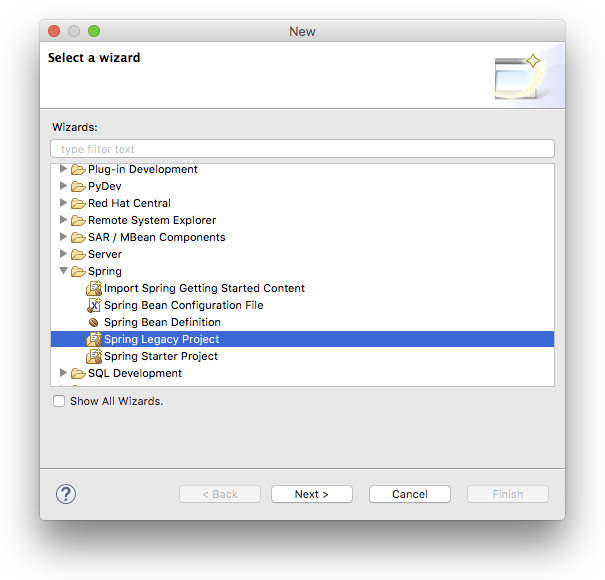
STS나 Eclipse 를 설치했다면 Spring Legacy Project 를 제공한다. File 메뉴 -> New -> Other.. 를 클릭하면 나오는 팝업창에서 ‘Spring’ 폴더를 클릭하면 다음과 같은 화면에 ‘Spring Legacy Project’ 가 보입니다.
이제 ‘Next’ 를 누르면 다음과 같은 화면이 나온다.
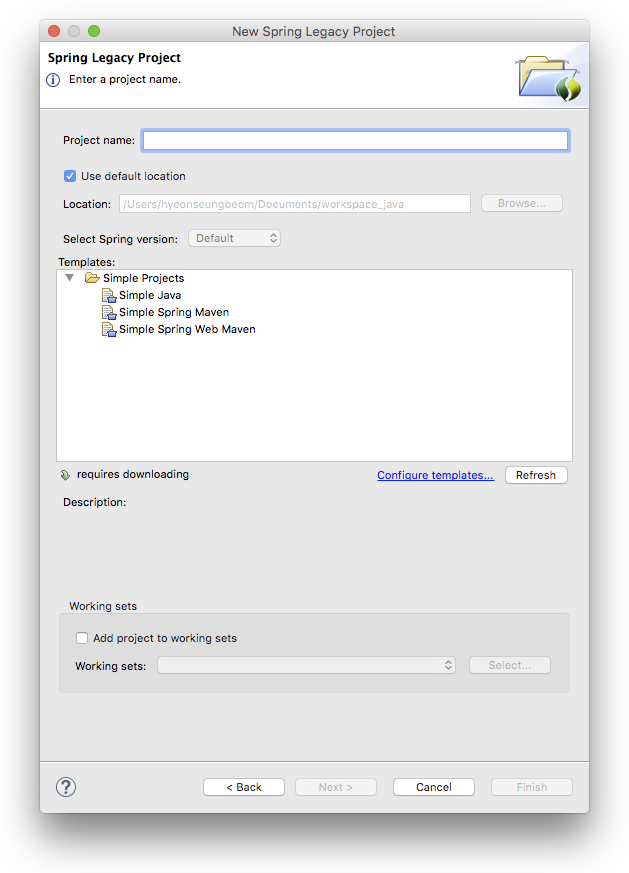
하지만 위 화면과 같이 나올 수도 있다. 원래는 MVC Project 가 나와야 하는데, 보이지 않는다. 그럴때는 위 화면에 ‘Configure templates…’ 를 클릭한다.
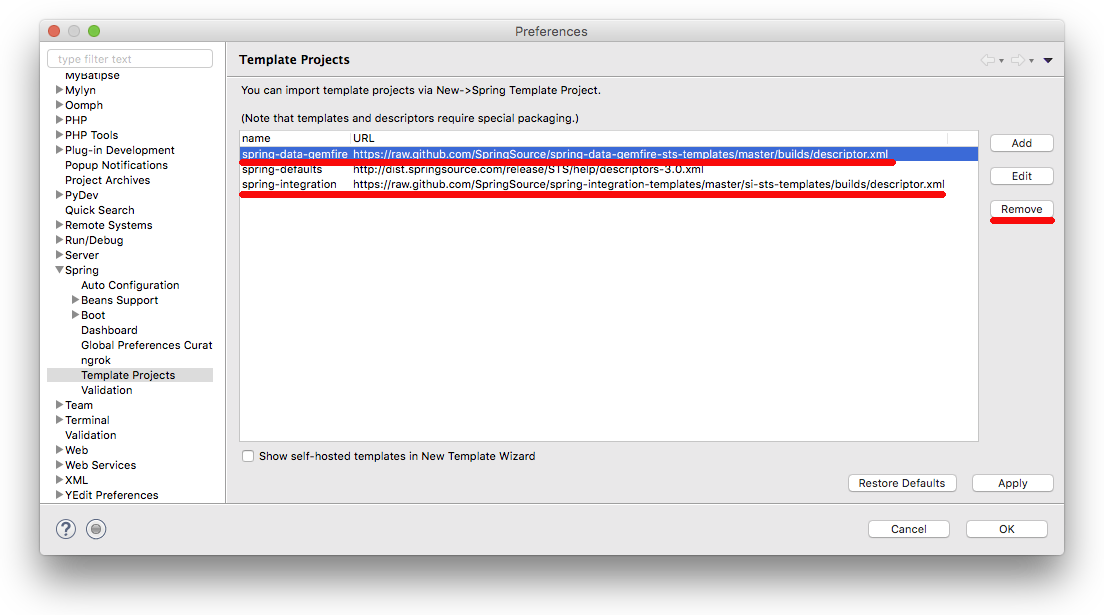
위 화면과 같이 두가지를 순차적으로 삭제 해준다. 위와같이 하면 이전화면이 다음과 같이 나온다. 삭제하고 난후에도 이전화면에서 ‘Spring MVC Project’ 가 나타나지 않으면 Eclipse 를 재시작해준다.
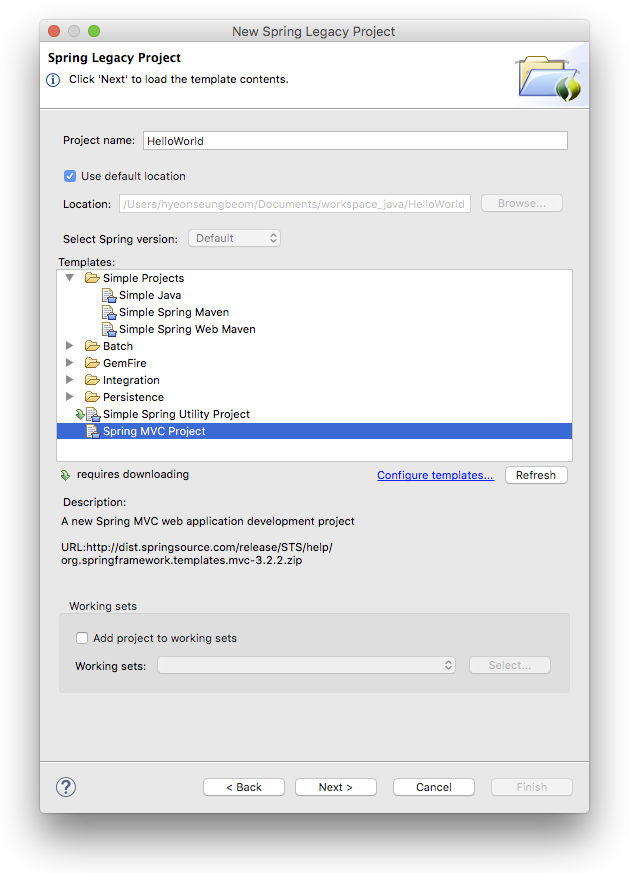
위 화면과 같이 Project name 에는 ‘HelloWorld’ 를 적어주고 아래 Template 은 ‘Spring MVC Project’ 를 선택하고 ‘Next’ 를 해준다.
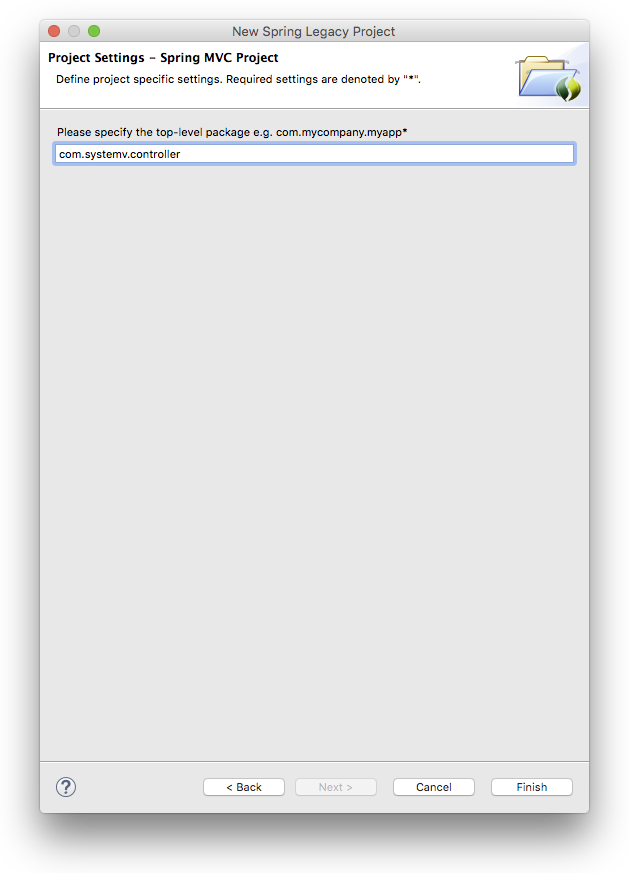
위와같이 패키지명을 입력하고 난 후에 Finish 를 누르면 Hello World 프로젝트가 작성된다.
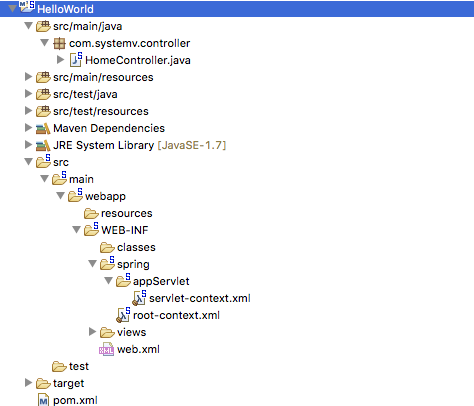
이를 실행시키면 Hello World 를 브라우져에서 확인해 볼수 있다.
UTF-8 로 출력하기
이는 Deployment Discriptor 인 Web.xml 파일에 Encoding 설정을 UTF-8 로 설정해 줘야한다. 이는 다음과 같다.
|
1 2 3 4 5 6 7 8 9 10 11 12 13 14 15 16 |
<filter> <filter-name>encodingFilter</filter-name> <filter-class>org.springframework.web.filter.CharacterEncodingFilter</filter-class> <init-param> <param-name>encoding</param-name> <param-value>UTF-8</param-value> </init-param> <init-param> <param-name>forceEncoding</param-name> <param-value>true</param-value> </init-param> </filter> <filter-mapping> <filter-name>encodingFilter</filter-name> <url-pattern>/*</url-pattern> </filter-mapping> |
Session 공유 테스트 코드
WAS 서버를 세팅할때에 Session 을 공유하도록 가끔은 구성할 때가 있다. 요즘은 spring-data-redis 를 이용해서 Redis 에 Session 을 저장하도록 지원하고 있지만 WAS 서버 자체적으로 Session 을 공유하도록 설정해서 운영할 수 있다.
이때 과연 WAS 서버들간 Session 이 제대로 공유되고 있는지를 확인할 필요가 있는데 이때 사용할 수 있는 코드다. 참고로 이 코드는 다음의 github 저장소에서 가지고 왔다.
먼저, Controller 를 다음과 같이 수정한다.
|
1 2 3 4 5 6 7 8 9 10 11 12 13 14 15 16 17 18 19 20 21 22 23 24 25 26 27 28 29 30 31 32 33 34 35 36 37 38 39 40 41 42 43 44 45 46 47 48 49 50 51 52 53 54 55 56 57 58 59 60 61 62 63 64 65 66 67 68 69 70 71 72 73 74 |
package com.systemv.controller; import java.text.DateFormat; import java.util.Date; import java.util.Locale; import javax.servlet.http.HttpSession; import org.slf4j.Logger; import org.slf4j.LoggerFactory; import org.springframework.stereotype.Controller; import org.springframework.ui.Model; import org.springframework.web.bind.annotation.RequestMapping; import org.springframework.web.bind.annotation.RequestMethod; import org.springframework.web.context.request.RequestContextHolder; import org.springframework.web.context.request.ServletRequestAttributes; /** * Handles requests for the application home page. */ @Controller public class HomeController { private static final Logger logger = LoggerFactory.getLogger(HomeController.class); /** * Simply selects the home view to render by returning its name. */ @RequestMapping(value = "/", method = RequestMethod.GET) public String home(Locale locale, Model model) { logger.info("Welcome home! The client locale is {}.", locale); Date date = new Date(); DateFormat dateFormat = DateFormat.getDateTimeInstance(DateFormat.LONG, DateFormat.LONG, locale); String formattedDate = dateFormat.format(date); model.addAttribute("serverTime", formattedDate ); ServletRequestAttributes attr = (ServletRequestAttributes) RequestContextHolder.currentRequestAttributes(); HttpSession session = attr.getRequest().getSession(); HttpServletRequest request = attr.getRequest(); String basePath = request.getScheme() + "://" + request.getServerName() + ":" + request.getServerPort(); String cPath = request.getContextPath(); String sPath = request.getServletPath(); String nodeId = System.getProperty("jboss.server.name"); String hostName = System.getProperty("java.rmi.server.hostname"); String variableString = (String)session.getAttribute("SESSION_TEST_VARIABLE"); int count = 0; if(variableString != null) { count = Integer.parseInt(variableString); count++; } session.setAttribute("SESSION_TEST_VARIABLE", String.valueOf(count)); model.addAttribute("basePath", basePath); model.addAttribute("cPath", cPath); model.addAttribute("sPath", sPath); model.addAttribute("sessionId", session.getId() ); model.addAttribute("session", session); model.addAttribute("nodeId", nodeId); model.addAttribute("hostName", hostName); model.addAttribute("count", count); return "home"; } } |
그리고 다음과 같이 home.jsp 파일을 수정해준다.
|
1 2 3 4 5 6 7 8 9 10 11 12 13 14 15 16 17 18 19 20 21 22 23 24 25 26 27 |
<%@ taglib uri="http://java.sun.com/jsp/jstl/core" prefix="c" %> <%@ page session="false" %> <html> <head> <title>Home</title> </head> <body> <h1> Hello world! </h1> <P> The time on the server is ${serverTime}. </P> <table columns=1> </table> <table columns=2> <tr><td><font color=blue>The basPath is: </font></td><td>${basePath}</td></tr> <tr><td><font color=blue>The cPath is: </font></td><td>${cPath}</td></tr> <tr><td><font color=blue>The sPath is: </font></td><td>${sPath}</td></tr> <tr><td><font color=blue>The sessionId is: </font></td><td>${sessionId}</td></tr> <tr><td><font color=blue>The sessionObj is: </font></td><td>${session}</td></tr> <tr><td><font color=blue>The nodeId is: </font></td><td>${nodeId}</td></tr> <tr><td><font color=blue>The server hostName is: </font></td><td>${hostName}</td></tr> <tr><td><font color=blue># of requests placed on session: </font></td><td>${count}</td></tr> </table> </body> </html> |
위와같이 수정하고 실행을하면 세션관련된 내용을 출력되고 세션 공유를 테스트해 볼 수 있다.
JBoss EAP 에서 세션 공유
코딩만으로는 Session 공유가 되지 않는다. WEB-INF 디렉토리에 ‘jboss-web.xml’ 을 만들고 다음과 같이 작성한다.
|
1 2 3 4 5 6 7 8 9 10 11 12 13 14 15 16 17 18 19 20 21 22 23 24 25 26 27 28 29 |
<!DOCTYPE jboss-web PUBLIC "-//JBoss//DTD Web Application 5.0//EN" "http://www.jboss.org/j2ee/dtd/jboss-web_5_0.dtd"> <jboss-web> <!-- Uncomment the security-domain to enable security. You will need to edit the htmladaptor login configuration to setup the login modules used to authentication users. <security-domain>java:/jaas/jmx-console</security-domain> --> <replication-config> <!-- Possible Values: ACCESS SET_AND_GET SET_AND_NON_PRIMITIVE_GET SET --> <replication-trigger>SET_AND_NON_PRIMITIVE_GET</replication-trigger> <!-- Possible Values: SESSION ATTRIBUTE FIELD --> <replication-granularity>SESSION</replication-granularity> </replication-config> </jboss-web> |
그리고 web.xml 파일에 다음을 추가해 준다.
|
1 |
<distributable /> |
위와 같이 하면 웹 애플리케이션에서 세션이 공유된다.